Article
If you’ve ever crouched over a pile of soil on your garage floor or balanced a tray of seedlings on a wobbly card table, you already know exactly why a diy potting bench changes everything. There’s something oddly satisfying about having a dedicated workspace in the garden—a proper spot where tools hang within reach, soil doesn’t end up on the kitchen counter, and repotting actually feels enjoyable rather than like a chore you keep putting off.
Whether you’re a weekend warrior with a handful of power tools or someone who’s never built anything more complicated than IKEA furniture, building your own potting bench is genuinely one of the most rewarding projects you can tackle. It doesn’t require advanced carpentry skills, it’s remarkably budget-friendly compared to store-bought versions, and the result is something you’ll use every single gardening season for years to come.
This guide covers everything—from choosing the right wood and working through potting bench plans, to adding clever storage touches that make your garden workbench as functional as it is beautiful. By the time you’re done reading, you’ll have a clear picture of exactly how to build the diy potting bench that fits your space, your budget, and your gardening style.
Why Every Gardener Needs a Potting Table
Ask any serious gardener what single addition transformed their outdoor routine, and a potting table or dedicated workspace will come up again and again. The reasons are practical as much as they are aesthetic.
Working at a proper bench height—typically around 36 inches, similar to a kitchen counter—eliminates the back strain that comes with ground-level planting. A garden potting bench gives you a stable surface for working with large containers, a place to keep soil bags off the ground, and dedicated storage for trowels, gloves, and fertilizer bottles that would otherwise disappear into the depths of a shed.
Beyond the ergonomics, there’s something about having an organized diy potting station that makes you actually want to spend time gardening. When everything has a place and you’re not hunting for the watering can or digging through a pile of unlabeled seed packets, the whole experience becomes more meditative and less maddening.
And from a purely practical standpoint? A homemade potting bench costs a fraction of what you’d pay at a garden center. A comparable commercial unit can easily run $300–$600 or more. With a solid set of potting bench plans, quality lumber, and a weekend afternoon, you can build something sturdier, more personalized, and far more satisfying for a fraction of that cost.
Choosing the Right Wood for Your Potting Bench
Before you pick up a saw or sketch out diy potting bench plans, the most important decision you’ll make is your choice of lumber. Wood selection determines how long your bench lasts, how much maintenance it needs, and what it ultimately looks like.
Cedar: The Gold Standard for Outdoor Projects
A cedar potting bench is widely considered the best choice for outdoor garden furniture, and for good reason. Cedar is naturally rot-resistant, repels insects without chemical treatment, and holds up beautifully through rain, humidity, and temperature swings. It’s also relatively lightweight, which makes working with cedar potting bench plans a pleasant experience compared to heavier hardwoods.
The warm reddish tone of fresh cedar weathers to a soft silver-gray over time if left unsealed, which many gardeners find charming. If you prefer to preserve the original color, a simple annual coat of teak oil or exterior wood sealer does the job without much effort.
Douglas Fir and Pine: Budget-Friendly Alternatives
If cedar is outside your budget, Douglas fir and pressure-treated pine are solid alternatives for diy potting bench construction. Pressure-treated lumber is especially durable and resists moisture and insects, though it should be allowed to dry before sealing if you’re working with freshly treated boards.
Standard construction-grade pine works perfectly well for interior or covered potting benches—say, inside a potting shed—where it won’t be exposed to the elements directly. For an outdoor potting bench, you’ll want to apply a good exterior finish and possibly re-seal it annually.
Reclaimed Wood: Character and Sustainability
For those who love the look of a rustic potting bench or rustic potting table, reclaimed barn wood or salvaged lumber is worth considering. The weathered texture gives instant character, and repurposing old wood is genuinely sustainable. Just make sure any reclaimed lumber is structurally sound—check for rot, splits along the grain, and embedded nails or hardware before you start cutting.
Understanding Potting Bench Dimensions and Layout
Getting the potting bench dimensions right before you build is crucial. A bench that’s too tall will strain your shoulders; too short and you’re back to hunching. A layout that doesn’t account for storage leaves you with a beautiful surface but nowhere to put anything.
Standard Heights and Widths
The most comfortable working height for most adults falls between 34 and 38 inches. If you’re taller than 6 feet, aim for the higher end of that range. For a narrow potting bench designed for a tight corner or small balcony, a depth of 18–20 inches is workable without sacrificing usability.
A full-sized garden work bench typically runs 4 to 6 feet wide. If you’re planning a larger setup, a 6-foot bench gives you room for active planting on one side and storage or display space on the other. If space is limited, a simple potting bench at 4 feet wide is more than adequate for most gardening tasks.
Planning for Storage
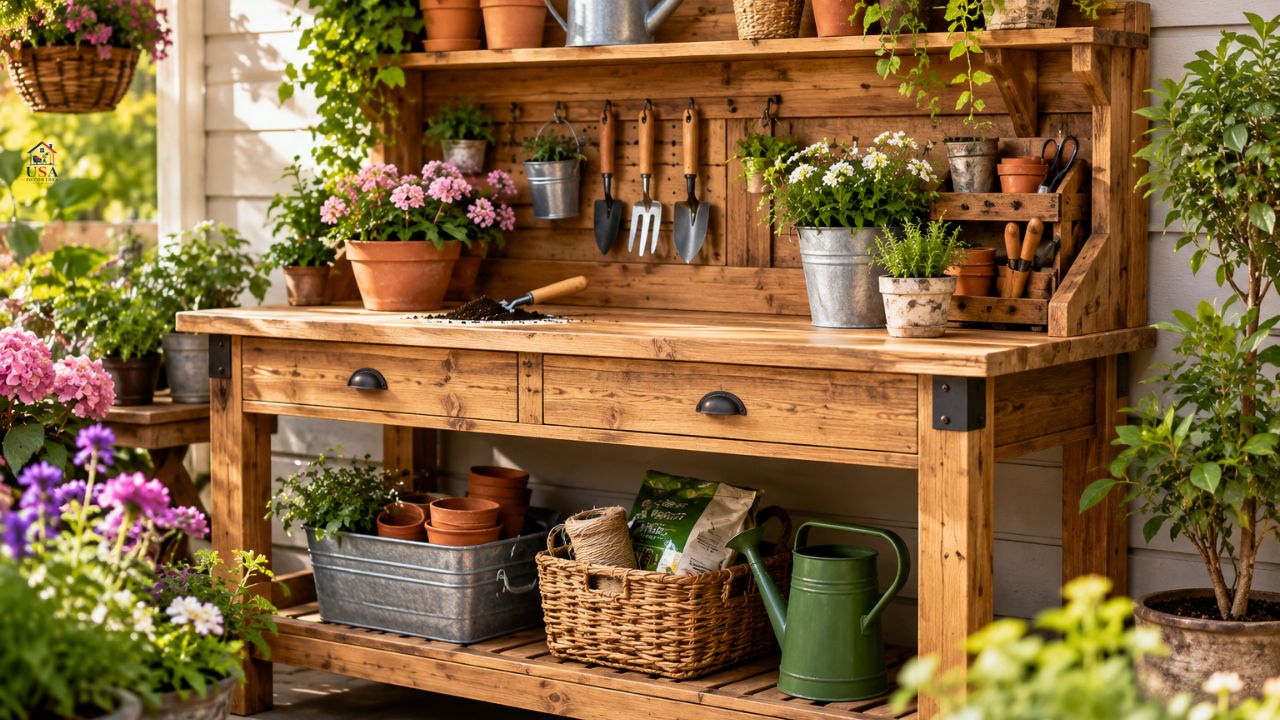
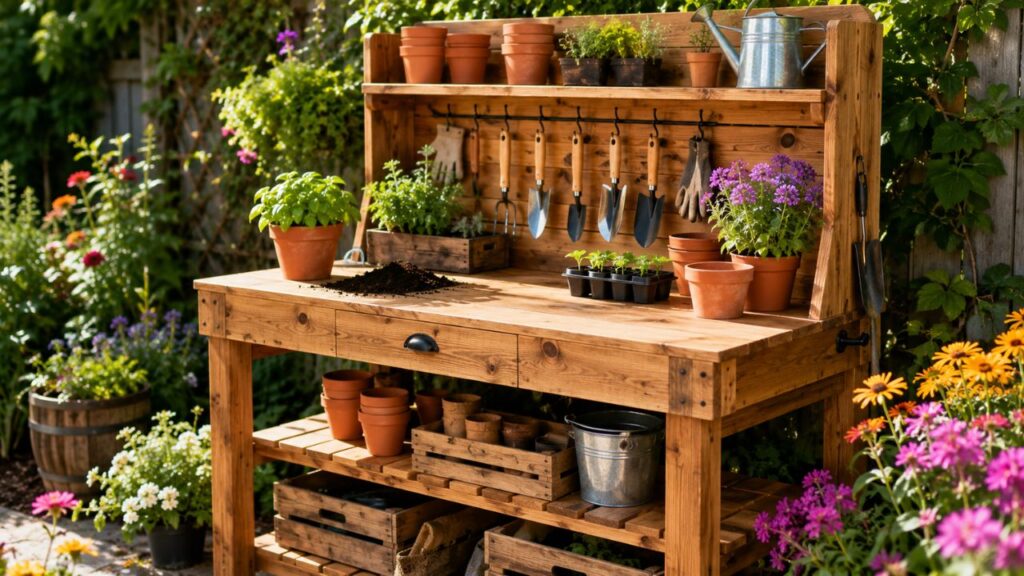
The most versatile potting bench designs integrate storage directly into the structure. Think about what you actually need within arm’s reach: a spot for soil bags underneath, a shelf for pots and containers at mid-level, and a pegboard or rail along the back for hanging hand tools.
Many diy potting bench ideas incorporate a built-in potting tray—a recessed section of the work surface lined with galvanized sheet metal or left open to allow soil to fall through into a bin below. This one feature alone eliminates most of the mess associated with repotting work.
Step-by-Step: How to Build a Potting Bench
Now for the satisfying part. Here’s a practical walkthrough of how to build a potting bench that’s sturdy, attractive, and genuinely useful. This guide is based on a standard 4-foot simple potting bench design—one of the most popular and adaptable potting bench plans available.
Materials List
Before you start, gather these materials (adjust quantities for your specific dimensions):
- 4×4 cedar or pine posts (for legs): 4 pieces at 38 inches each
- 2×4 lumber (for frame rails and supports): approximately 8 pieces at 8 feet each
- 1×6 cedar boards (for the work surface): 5–6 pieces at 4 feet each
- 1×4 cedar boards (for lower shelf): 4 pieces at 4 feet each
- Exterior wood screws (2.5″ and 3″)
- Wood glue (exterior-grade)
- Sandpaper (80 and 120 grit)
- Exterior wood finish or sealant
- Optional: pegboard for tool storage, galvanized hardware cloth for shelf liner
Step 1: Cut Your Lumber
Using your diy potting bench plans as a guide, cut all lumber to length before assembly. Label pieces as you go—it makes the build significantly less confusing once you have a pile of boards in front of you. Double-check measurements before cutting; cedar in particular can be expensive to waste.
Step 2: Build the Frame
Assemble the two side frames first. Each consists of two legs connected by front and back horizontal rails at the top and at the lower shelf height. Use exterior screws and wood glue at each joint for a rock-solid connection. Pre-drill all holes to prevent splitting, which is especially important near the ends of boards.
Once both side frames are complete, connect them with the front and rear crossbars to create the full rectangular frame. Check for square at each corner using a measuring tape diagonally—if the two diagonal measurements match, you’re square. If not, apply gentle pressure to one corner until they align before tightening the final screws.
Step 3: Add the Work Surface
Lay your 1×6 surface boards across the top frame rails, spacing them slightly (about 1/8 inch) to allow for wood movement and drainage. Screw down each board with two screws per rail crossing, keeping the screw heads slightly countersunk for a clean finish.
If your potting bench designs include a built-in soil tray, leave a gap in the center of the surface—typically 12–16 inches wide—and frame it with additional 2×4 supports before lining with galvanized sheet metal bent to form a shallow tray.
Step 4: Install the Lower Shelf
The lower shelf is one of the most practical features of any garden work bench plans. Install the shelf boards across the lower frame rails in the same manner as the top surface. This shelf is ideal for storing bags of potting mix, large containers, or a tray of seedlings waiting to be transplanted.
Step 5: Add the Backsplash and Tool Storage
A vertical backsplash—typically made from 1×6 boards arranged horizontally or a section of pegboard—finishes the back of the bench and provides a natural anchor for tool hooks. Potters bench ideas often include a simple rail made from a length of 2×4 with large S-hooks, which holds trowels, cultivators, and pruning shears without any complicated installation.
If you’re going the pegboard route, use 1/4-inch exterior-grade pegboard and mount it with spacers so it sits about 1/2 inch off the backing boards—this allows the hooks to seat properly.
Step 6: Sand and Finish
Sand all surfaces, starting with 80-grit and finishing with 120-grit, paying particular attention to any rough edges or raised grain. Round over sharp corners slightly for a polished look. Apply your chosen exterior finish—teak oil, exterior deck stain, or a clear wood sealer—and allow it to dry completely before loading the bench with tools and soil.
Creative Potting Bench Ideas to Personalize Your Space
The basic build is just the starting point. These diy potting bench ideas can take a functional workstation and turn it into a real focal point in your garden.
Add a Galvanized Metal Sink
A small galvanized bucket or an inset utility sink connected to an outdoor hose line transforms a basic diy gardening table into a fully functional potting work bench. Washing pots, rinsing off tools, and filling watering cans becomes completely effortless.
Build a Fold-Down Extension
If space is tight, consider adding a hinged fold-down extension on one side of the bench. This gives you a narrow potting bench for everyday use that expands when you’re doing larger repotting projects or need space for multiple flats of seedlings.
Create a Dedicated Seed Starting Station
A plant potting station optimized for seed starting can include built-in grow light fixtures overhead, a dedicated section for heat mats, and small shelves sized specifically for seedling trays. This kind of specialized potting station ideas setup makes the most of limited space during the early spring rush.
Incorporate Vintage and Repurposed Elements
A rustic potting bench gains enormous charm from unexpected materials: old window frames used as decorative backsplash panels, vintage mason jars mounted to a wooden rail for holding small tools, or salvaged cabinet hardware for drawer pulls. These touches make a homemade potting bench look intentional and curated rather than purely utilitarian.
Potting Bench Kit vs. Building from Scratch
Not everyone wants to start from raw lumber. A potting bench kit offers a middle path—you get pre-cut, pre-drilled components that assemble in a few hours without requiring precise cutting or a full workshop setup.
Kits are an excellent option if you’re working with limited tool access or if you want the satisfaction of building a potting bench without the full carpentry commitment. The tradeoff is that kits are generally more expensive than buying raw lumber, and you have less flexibility to customize dimensions or add features.
For a truly bespoke outdoor garden workbench, building from diy potting bench plans is almost always the better investment—both financially and in terms of the final result.
Inspiring Designs: From Simple to Spectacular
The range of potting bench ideas diy builders have come up with is genuinely impressive. Here are a few design directions worth considering depending on your style and space.
The Simple Workbench Style
Clean lines, minimal ornamentation, and a focus on pure function define this approach. A simple potting bench in this style typically features two shelves, a clean work surface, and a simple pegboard back. It’s easy to build from simple potting bench plans and suits modern or minimalist garden aesthetics beautifully.
The Cottage Garden Potting Table
A potting table diy built in the cottage style leans into weathered finishes, painted details, and decorative touches like bead-board backsplash panels. Painting the frame a soft sage green or classic white and distressing the finish slightly gives the bench that lived-in, charming quality that feels right at home alongside rambling roses and raised beds.
The Serious Gardener’s Garden Workbench
For those who spend serious time in the garden, a full-featured outdoor potting bench with a sink, multiple storage tiers, a built-in bin for compost or soil waste, and overhead hooks for hanging baskets represents the high end of what garden workbench plans can achieve. It’s a bigger build, but the result is a workspace that genuinely rivals a professional nursery setup.
The Potting Shed Table
A potting shed table built into an existing shed makes brilliant use of wall space. Fold-down or wall-mounted designs can be incorporated directly into the shed structure, with deep shelves above and below and the added benefit of full weather protection. Planting table plans for shed installations often include electrical outlets for grow lights and heating mats.
Maintaining Your DIY Potting Bench
A well-built diy potting bench should last 10–20 years with basic maintenance. Here’s what that looks like in practice:
- Annual inspection: Check all screws for corrosion and tighten any that have worked loose. Replace any visibly rusting hardware with stainless steel or galvanized equivalents.
- Re-sealing: Apply a fresh coat of exterior finish every 1–2 years, or whenever the wood starts to look dry or gray (if you’ve chosen to seal it rather than let it weather naturally).
- End-of-season cleanup: Empty all soil from trays and shelves, brush off accumulated dirt, and store loose accessories indoors if possible. This simple step dramatically extends the life of even basic pine construction.
- Wood treatment: Any areas where soil or moisture sits consistently—particularly the shelf slats and work surface—benefit from occasional treatment with a wood preservative.
FAQ
Frequently Asked Questions About DIY Potting Benches
What is the best wood for a diy potting bench?
Cedar is generally considered the best choice for an outdoor diy potting bench due to its natural resistance to rot and insects. If budget is a concern, pressure-treated pine offers similar durability at a lower price point. For covered or indoor installations, standard Douglas fir or common pine works well with a good exterior finish.
How much does it cost to build a potting bench?
Building a basic diy potting bench from cedar lumber typically costs between $80 and $200 depending on your local lumber prices and the size of the bench. A more elaborate design with a sink, multiple shelves, and premium hardware might run $250–$400. This compares very favorably to commercial potting bench kit options, which often start at $200 for basic models and exceed $500 for quality units.
How tall should a potting bench be?
Standard potting bench dimensions put the work surface at 34–38 inches from the ground. The ideal height matches your natural standing work height—roughly the height at which your hands rest comfortably without bending your back. Taller gardeners should aim for 36–38 inches; those who are shorter may find 32–34 inches more comfortable.
Can I build a potting bench without power tools?
Yes. While power tools make the job faster and cuts cleaner, a good handsaw, a cordless drill, and basic measuring tools are all you strictly need to complete most simple potting bench plans. If you have boards cut to size at the lumber yard (most will do this for a small fee), the assembly itself requires only a drill and basic hand tools.
What’s the difference between a potting bench and a gardening table?
The terms are often used interchangeably. A diy gardening bench or diy gardening table tends to describe any outdoor work surface used for garden tasks. A garden potting bench more specifically implies a workstation designed for potting and repotting plants, typically with integrated storage for soil, pots, and tools. In practice, the best builds serve both purposes.
How do I waterproof a potting bench?
For a cedar potting bench, a penetrating oil finish like teak oil or a specialized cedar sealer provides excellent protection while highlighting the natural grain. For pine or fir builds, an exterior deck stain or solid color exterior paint forms a tougher protective layer. Reapply every 1–2 years, or after any season where the bench has been exposed to heavy rainfall.
What should I store on a potting bench?
A well-organized garden potting bench keeps frequently used items at or near the work surface: hand tools (trowels, transplanting forks, pruners), gloves, a watering can, seed packets, and plant labels. Less frequently used items—extra pots, bags of fertilizer, bulb storage—work well on the lower shelf. Overhead hooks or a pegboard backsplash are ideal for long-handled tools.
Can I build a potting bench on a small balcony or patio?
Absolutely. A narrow potting bench designed at 16–20 inches deep and 3–4 feet wide fits comfortably on most patios. Wall-mounted fold-down versions are even more space-efficient. Look for planting bench plans specifically designed for small-space gardening; these typically incorporate vertical storage to maximize functionality in a compact footprint.
Conclusion
Build the Garden Workspace You Actually Deserve
There’s something deeply satisfying about building something with your own hands and then using it every day. A diy potting bench sits in that sweet spot of projects that are genuinely achievable in a weekend, genuinely useful for years, and genuinely enjoyable to make. Whether you go with classic cedar potting bench plans, a rustic reclaimed-wood design, or a streamlined modern garden workbench, the result will be a workspace that fits your garden and your way of working—not a generic kit built to someone else’s specifications.
Start with your dimensions, choose your wood, sketch out your potting bench plans, and gather your materials. Everything else follows naturally from there. Your future self—the one who’s happily repotting herbs in the spring sunshine without a sore back or a missing trowel—will be very glad you did.