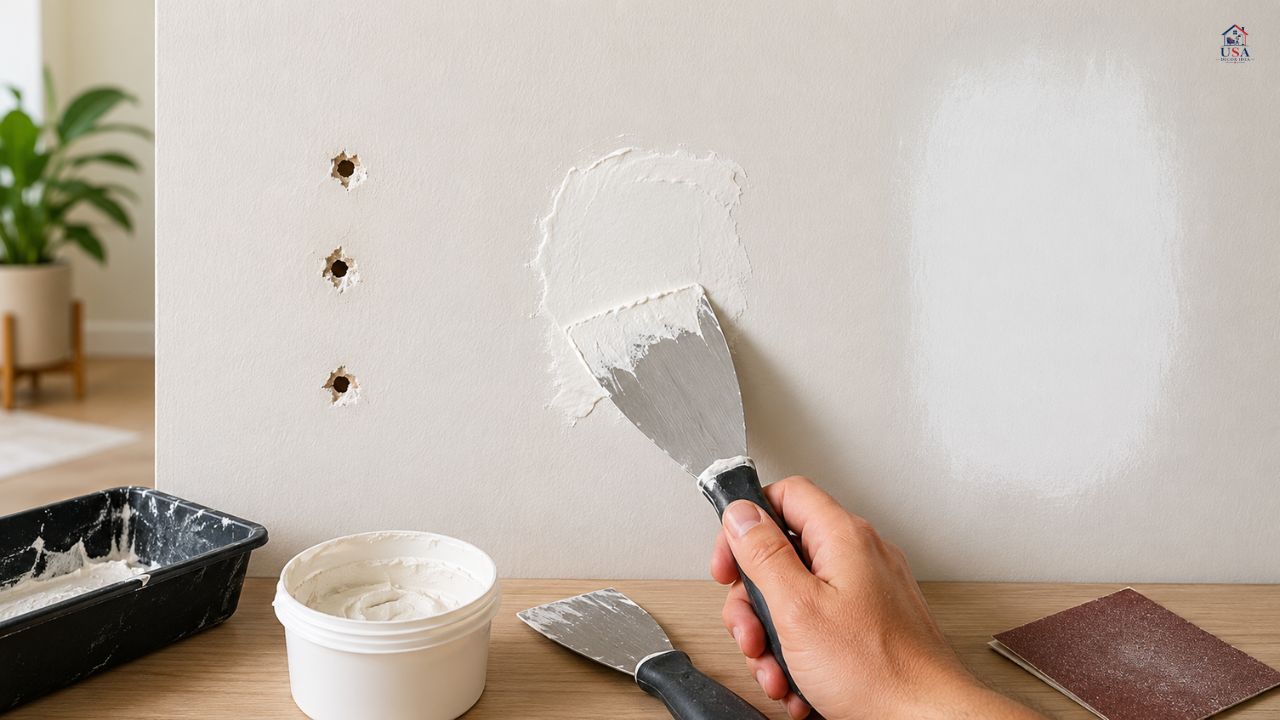
You finally decided to rearrange the living room or take down that shelf that has been hanging on the wall for years. Great decision—until you turn around and see the wall. A cluster of ugly, gaping holes stares back at you, left behind by plastic expansion anchors, toggle bolts, or metal self-drilling anchors. If you have ever stood there wondering how to repair drywall anchor holes, you are far from alone. It is one of the most common DIY headaches homeowners face, especially before moving out, selling a home, or freshening up a room.
The good news? Knowing how to repair drywall anchor holes is a skill that almost anyone can master with the right materials, a little patience, and a clear game plan. Whether you are dealing with a tiny nail-sized hole or a wider cavity left behind by a heavy-duty toggle anchor, the process follows a logical sequence that does not require professional training or expensive tools.
In this guide, we are going to walk you through everything: the types of holes you might encounter, the materials you will need, step-by-step repair techniques for different hole sizes, and how to get a finish so smooth that even you will not be able to tell where the hole was. By the time you finish reading, filling holes in drywall will feel less like a chore and more like a satisfying weekend project.
Understanding Drywall Anchor Holes: What You Are Actually Dealing With
Before you can fix the problem, it helps to understand what drywall anchors actually do to the wall when they are installed and removed. Drywall—also called gypsum board or sheetrock—is made of a soft gypsum core sandwiched between two layers of paper. It is strong enough for most everyday purposes, but it is not designed to hold screws or hooks without some additional support when there is no stud nearby.
That is where anchors come in. When you drive an anchor into drywall, it expands inside the wall cavity to create a grip. When you remove that anchor—either by pulling it out, unscrewing it, or pushing it into the wall—it leaves behind a hole that is often larger, more ragged, and more irregular than a simple nail hole. Understanding the type of damage helps you choose the right repair method.
Common Types of Drywall Anchor Holes
- Plastic expansion anchors: These leave a round hole roughly 3/16 to 1/4 inch wide. The edges are usually clean but slightly frayed.
- Self-drilling metal anchors: These leave a threaded, somewhat wider hole with torn paper edges around the perimeter.
- Toggle bolts: These can leave holes up to 1/2 inch wide, sometimes with cracked or crumbled drywall around the opening.
- Molly bolts: Similar to toggle bolts in damage profile, especially if they were removed rather than pushed through.
- Snap-toggle and Snaptoggle anchors: Often leave the cleanest holes but still require patching for a seamless finish.
No matter which type you are dealing with, the core process of how to repair drywall anchor holes is the same: clean the damage, apply the right filler, sand smooth, and paint. The difference is in the size of the patch and the number of steps involved.
Tools and Materials You Will Need
One reason people hesitate to tackle how to fill holes in wall projects is that they assume it requires a trip to the hardware store and a cart full of products. In reality, most repairs need only a handful of inexpensive items, several of which you may already own.
Basic Supply List for Filling Holes in Drywall
- Spackling compound or lightweight joint compound: The workhorse of any drywall patch job. Spackling is ideal for small holes; joint compound works better for medium to large repairs.
- Putty knife or drywall knife (3–6 inch): For applying compound and feathering edges.
- Sandpaper (120-grit and 220-grit): For smoothing the patch after drying.
- Primer: Essential before painting to prevent the patch from showing through as a dull spot.
- Matching paint: For the final coat. If possible, save a small amount of your original wall paint for touch-ups.
- Self-adhesive mesh patch (for larger holes): Provides structural support for patches bigger than 1/2 inch.
- Drywall patch kit (for major damage): Includes a backing panel, clips, or a California patch piece for holes over 3 inches.
- Clean sponge or damp cloth: For cleanup and feathering wet compound.
- Painter’s tape (optional): Helpful for protecting surrounding areas when applying compound.
Having the right materials on hand makes how to repair drywall anchor holes a smooth, efficient process rather than a frustrating one. When in doubt, choose a lightweight all-purpose joint compound—it sands easily, dries faster than traditional joint compound, and is forgiving for beginners.
How to Repair Drywall Anchor Holes: Step-by-Step by Hole Size
Not every anchor hole is the same, and neither is every repair. The approach you take should match the size and severity of the damage. Below is a complete breakdown of techniques from the simplest fixes to more involved repairs. Think of this as your complete field guide to filling holes in drywall properly.
Repair Method Quick Reference (Infographic)
| Hole Type | Best Material | Drying Time | Difficulty |
| Nail/screw hole | Spackling compound | 1–2 hours | Easy |
| Anchor hole (small) | Joint compound | 4–8 hours | Easy |
| Anchor hole (medium) | Patch + compound | 24 hours | Medium |
| Large anchor damage | Mesh patch kit | 24–48 hours | Medium |
| Major wall damage | Drywall panel | 48+ hours | Hard |
Table 1: Anchor hole repair methods by damage size and difficulty.
Repairing Small Anchor Holes (Under 1/4 Inch)
These are the easiest holes to fix and the most common result of plastic expansion anchors. To fill anchor holes in drywall at this scale, you barely need more than a finger, a putty knife, and some spackling.
- Start by removing any leftover anchor material. If the anchor is still in the wall, use needle-nose pliers to pull it out or a screwdriver to push it completely through into the wall cavity.
- Clean the area around the hole with a dry cloth to remove dust and debris.
- Scoop a small amount of lightweight spackling compound onto the tip of your putty knife.
- Press the compound firmly into the hole, slightly overfilling it so the compound sits proud of the wall surface.
- Use the putty knife edge to scrape away the excess, leaving the patch nearly flush with the wall.
- Allow the patch to dry completely—typically 1 to 2 hours, though some compounds dry faster.
- Once dry, lightly sand with 220-grit sandpaper until the patch is perfectly smooth and flush.
- Prime the spot, then paint to match.
That is it. Small anchor holes are genuinely that simple—and with practice, you can patch one in under five minutes.
Repairing Medium Anchor Holes (1/4 to 3/4 Inch)
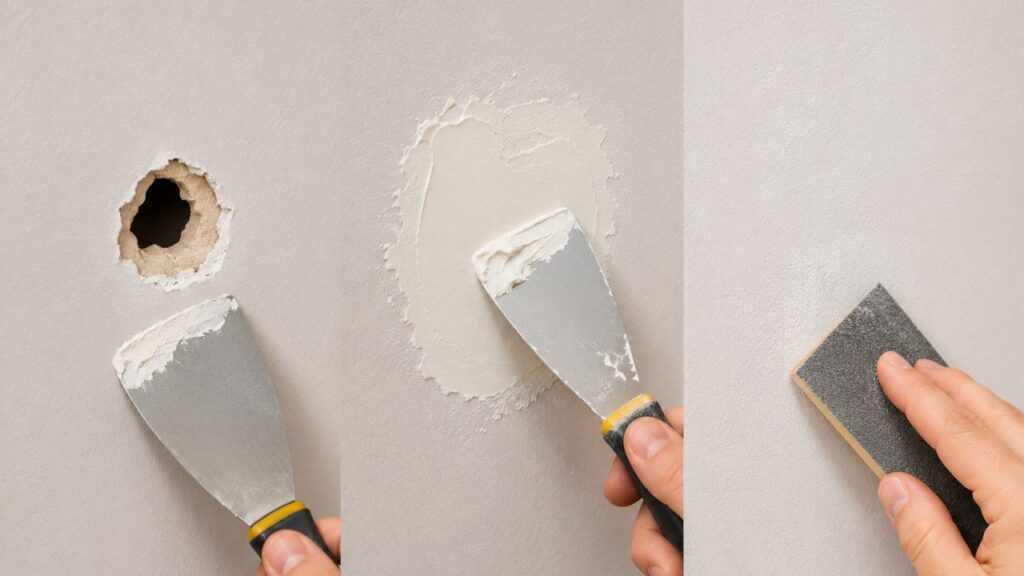
Medium-sized holes—the kind left by self-drilling metal anchors or toggle bolts—require a bit more material and patience, but the process is still very manageable. This is where joint compound starts to outperform spackling because it feathers out more easily over a wider area.
- Remove any anchor remnants as described above.
- If the hole edges are ragged or crumbling, use a utility knife to carefully trim away any loose paper or crumbled gypsum until you have a clean opening.
- Cut a piece of self-adhesive mesh patch slightly larger than the hole—enough to cover it with at least 1/2 inch of overlap on all sides.
- Press the mesh patch firmly over the hole, smoothing it down so it adheres completely.
- Apply a thin coat of all-purpose joint compound over the mesh, using a 4 to 6-inch putty knife. Work the compound into the mesh and feather the edges outward in all directions.
- Allow to dry completely—at least 4 to 8 hours, or overnight.
- Sand lightly with 120-grit sandpaper, then apply a second thin coat of compound.
- Let the second coat dry, then sand again with 220-grit until the surface is perfectly smooth.
- Prime and paint.
The secret to a truly invisible repair at this size is thin coats. Thick coats crack, shrink unevenly, and are much harder to sand flush. Two or three thin coats will always outperform one thick application when you are filling holes in drywall.
Repairing Large Anchor Holes and Surrounding Damage (3/4 Inch to 3 Inches)
If a toggle bolt pulled out aggressively, or if someone removed an anchor carelessly, you may be left with significant wall damage—cracked, crumbled drywall in a wider pattern around the original hole. This requires a more structured approach to how to repair drywall anchor holes effectively.
- Assess the full extent of the damage. Gently press around the hole to check for soft or crumbling areas. Remove all loose material with a utility knife or putty knife.
- If the gypsum core is significantly damaged beyond just the hole, cut the area into a clean square or rectangle using a drywall saw. This gives you clean edges to work with and allows a proper patch piece to be inserted.
- For holes under 3 inches that do not require cutting: use a larger self-adhesive mesh patch (available in 4×4 inch or 6×6 inch sizes) and apply multiple thin coats of joint compound.
- For cut-out square repairs: use the California Patch method (see below) for a sturdy, professional result.
- Apply compound in thin layers—you may need 3 to 4 coats, with full drying and sanding between each.
- Final sanding should be done with 220-grit paper, using a sanding block for a flat, even surface.
- Prime the repair area with a drywall primer-sealer before painting.
The California Patch Method for Clean Cutouts
Cut a drywall piece slightly larger than your cutout. Score the back of the patch 1 inch in from all edges, then snap off the gypsum while keeping the front paper intact. This gives you a drywall patch with a paper flap around all four sides. Insert the patch into the hole and smooth the paper flaps onto the wall surface with joint compound. The flaps act as a built-in tape, creating an incredibly strong bond without needing additional backing boards. This is one of the most effective techniques for how to fill holes in wall when the damage is significant but still under 3 inches.
How to Fill Holes in Wall When You Have Multiple Patches to Do
If you are clearing out an entire room’s worth of anchor holes—perhaps before a repaint or before moving out of a rental—it pays to work efficiently. Here is a practical system that saves time and product when how to repair drywall anchor holes at scale.
- Do a full survey first: Walk the room and mark every hole with a small piece of blue painter’s tape. Count the total and sort them by size so you can batch similar repairs together.
- Work in batches: Apply compound to all small holes first, then medium holes, so everything can dry simultaneously rather than doing them one at a time.
- Use a larger knife for feathering: A 6 to 8-inch putty knife lets you blend compound into a wider area, making multi-hole patches less noticeable after painting.
- One primer, multiple spots: Apply primer to all repaired spots at once before doing any touch-up painting.
- Consider a full wall repaint: If you have more than five or six patches on one wall, a full repaint is almost always worth it—touch-up spots rarely match exactly, especially on older paint.
Taking a methodical approach to filling holes in drywall across a whole room transforms what feels like an overwhelming task into a manageable afternoon project.
Common Mistakes to Avoid When You Fill Anchor Holes in Drywall
Even experienced DIYers run into problems when patching drywall. Here are the most frequent mistakes—and how to avoid them.
Skipping the Primer
This is the number one reason patched spots show through the paint. Joint compound and spackling are highly porous, and paint absorbs into them at a different rate than the surrounding wall. Without primer, the patched area will appear as a flat, dull circle even after painting—sometimes called a “hot spot” or “flashing.” Always prime before you paint.
Applying Compound Too Thick
A thick layer of joint compound will shrink as it dries, pulling away from the edges and cracking through the center. This creates more work, not less. When filling holes in drywall, always apply thin coats and build up gradually.
Not Letting Each Coat Dry Fully
Joint compound must be completely dry before sanding or applying the next coat. It will appear white when fully dry and slightly grayish-blue when still wet. Rushing this step leads to tearing, uneven surfaces, and compound that pulls away from the wall.
Forgetting to Remove the Anchor First
Applying compound over an anchor that is still in the wall is a recipe for a bumpy, uneven patch. Always remove or fully push the anchor into the wall cavity before filling holes in drywall. If the anchor cannot be fully removed, drive it inward so it sits at least 1/8 inch below the wall surface, then fill over it.
Sanding Too Aggressively
Drywall paper tears easily. If you sand through the compound and into the paper surface of the drywall, you will create a new problem—fuzzy, frayed paper that shows through paint. Always use a light hand with sandpaper and let the compound do the work.
Finishing Like a Professional: Paint Matching and Texture
Even a perfectly flat, smooth patch can stand out if the wall has a texture or if the paint has changed color over the years. Here is how to close the gap between a good repair and an invisible one.
Matching Wall Texture
Most residential walls in North America have either an orange peel texture (light, bumpy surface like the skin of an orange) or smooth drywall. If your walls are smooth, sanding the patch flat is sufficient. If your walls have texture, you will need to replicate it.
- Orange peel texture: Available in spray cans at any hardware store. After priming the patch, hold the can about 12 to 18 inches from the wall and apply short bursts. Practice on a piece of cardboard first to get the spray distance and pressure right.
- Knockdown texture: Apply thinned joint compound with a roller, then knock down the peaks with a drywall knife held nearly flat against the wall before it dries fully.
- Skip trowel texture: Apply random trowel strokes of thin compound and allow the pattern to vary—no two patches look the same, and that natural randomness is what makes it blend in.
Paint Matching Tips
If you saved your original paint, great—apply two coats over the primed patch and you should be done. If you did not save it, bring a photo or a small chip sample to a paint store that offers color matching services. Most national hardware chains have spectrophotometer scanners that can match any color with impressive accuracy. When in doubt, paint the entire wall from corner to corner rather than spot-patching—it is the only way to guarantee a seamless result on older or faded walls.
Special Situations: When Repairing Anchor Holes Gets Complicated
Anchors Near Plumbing or Electrical
Before pushing an anchor into the wall cavity or cutting out drywall, check whether there might be pipes or wiring behind the wall. Use a stud finder with AC detection capability to identify electrical wires. If you are unsure, avoid drilling or cutting until you have confirmed the area is safe.
Moisture-Damaged Drywall
If the drywall around an anchor hole feels soft, crumbles more than expected, or shows any dark staining, there may be a moisture problem behind the wall. Do not simply patch over moisture-damaged drywall—it will not hold, and the underlying problem will continue to grow. Address the moisture source first, allow the area to dry completely, and replace any affected drywall before repairing cosmetically.
Anchor Holes in Plaster Walls
Older homes may have plaster walls rather than drywall, and plaster repairs require a slightly different approach. Plaster is more brittle than gypsum board and can crack more easily around anchor holes. Use a setting-type joint compound (the kind that hardens chemically rather than drying) for plaster repairs—it bonds more securely and does not shrink as much as standard compound.
Painted-Over Anchors
Sometimes anchors get painted over during previous renovations, making them difficult to identify and remove. If you can feel a raised bump through the paint, use a utility knife to carefully score around it, then use needle-nose pliers or a screw to extract the anchor before proceeding with your fill-in repair.
Frequently Asked Questions
How long does it take to repair drywall anchor holes?
Small anchor holes can be repaired in under 30 minutes of active work, plus 1 to 2 hours of drying time. Medium holes using mesh patches take about an hour of work spread over 24 hours when you factor in drying between coats. Large repairs with multiple compound coats may take 2 to 3 days from start to painted finish, though most of that is waiting, not working.
What is the best filler for anchor holes in drywall?
For small anchor holes, lightweight spackling compound is ideal—it dries fast, sands easily, and requires no mixing. For medium to large holes, all-purpose joint compound offers better coverage and smoother feathering over a wider area. For holes near the ceiling or in high-humidity areas like bathrooms, a setting-type compound that hardens chemically is more durable.
Can I use toothpaste or white caulk to fill anchor holes in drywall?
Toothpaste and white caulk are often suggested as quick fixes, but neither is a reliable long-term solution. Toothpaste can shrink significantly as it dries and will crack or crumble within weeks. Caulk remains flexible and tends to look shiny rather than matte, making it very visible under paint. Stick with purpose-made spackling or joint compound for a result that actually holds and looks professional.
Do I need to prime before painting over a repaired anchor hole?
Yes, absolutely. Primer is not optional—it seals the porous patch surface so that paint adheres and dries at the same rate as the surrounding wall. Skipping primer almost always results in a visible dull spot (called flashing) that is apparent in certain lighting. A single coat of drywall primer-sealer is all it takes.
How do I repair a drywall anchor hole that is surrounded by cracked paint?
First, scrape away all the cracked or peeling paint within about 1 to 2 inches of the hole using a putty knife or scraper. Then sand the edges of the paint to create a smooth, tapered transition before applying your compound. If you patch without removing the cracked paint first, the compound will not adhere properly and will likely peel off along with it.
What should I do if the anchor is stuck in the wall and won’t come out?
If a plastic expansion anchor will not pull out with pliers, the easiest solution is to use a screwdriver and push it fully into the wall cavity. It will fall inside the wall where it will cause no harm. Make sure it is pushed at least 1/8 inch below the wall surface so your compound can cover it completely. For metal toggle bolts, fold the wings flat before pushing them through.
How do I know when the joint compound is fully dry?
Fresh joint compound is slightly blue-gray or translucent when wet. It turns completely bright white when it is fully dry. You can also gently press the center of the patch—if it feels cool or soft, it still needs more drying time. Do not rush this step; sanding or painting over wet compound is one of the most common mistakes beginners make when filling holes in drywall.
Can I repair drywall anchor holes myself, or should I hire a professional?
For the vast majority of anchor holes—even medium-sized ones left by toggle bolts—professional help is absolutely not necessary. The materials cost under $20 and the techniques are straightforward to learn. Professional drywall repair is only worth considering when there is structural damage, extensive water damage, or when you need an entire section of drywall replaced and taped. For cosmetic repairs, how to repair drywall anchor holes is a skill well within reach of any confident DIYer.
How many coats of joint compound do I need for a smooth finish?
Most repairs require two to three coats for a truly smooth, paint-ready finish. The first coat fills the hole and adheres the mesh if you are using one. The second coat levels the surface. A third thin finishing coat—if needed—removes any remaining irregularities. More coats applied thinly will always produce a better result than fewer coats applied thickly.
Is there a quick no-sanding option for small anchor holes?
Some newer pre-mixed spackling products marketed as “no-sand” formulas are available and work reasonably well for very small nail or anchor holes. They are convenient for rental move-outs or quick prep work. However, for anything larger than a small nail hole, some light sanding is always recommended to ensure a perfectly flat, invisible result. A quick pass with 220-grit sandpaper takes only seconds and makes a noticeable difference in the final appearance.
Conclusion
Walls tell the story of the life lived inside a home—the shelves that held books, the hooks that held coats, the art that made a house feel like yours. When it is time to move on or refresh a space, those anchor holes do not have to be a source of stress or expense. Now that you understand how to repair drywall anchor holes from small to large, from simple spackling to structured California patches, you have everything you need to restore your walls to their original condition.
The most important thing to remember is that patience is your best tool. Thin coats, full drying time, proper priming—these are the habits that separate a patch that disappears from a patch that announces itself every time the light hits the wall at the wrong angle. When you fill anchor holes in drywall methodically and with the right materials, the results genuinely do look professional, even on your very first attempt.
Whether you are tackling one hole or twenty, filling holes in drywall is a skill that pays dividends for the rest of your life as a homeowner. Grab a putty knife, pick up a tub of lightweight joint compound, and get to work. Your walls are waiting—and they are easier to fix than you think.Article Word Count: ~3,000 words | Foc